This blog post is part 3 of my series on how to decrypt HTTPS traffic on your own network.
If you’ve been following from part 2, we have a tarball containing all the certificate and private key formats mitmproxy requires. Once we install mitmproxy and place the tarball files in the right directory, we will be ready to decrypt some HTTPS traffic.
Installing and configuring mitmproxy
To install mitmproxy under Ubuntu 16.04 we have to run
$ sudo apt install mitmproxy
$ mitmproxy --version
mitmproxy 0.15
Now that mitmproxy is installed, you can extract the tarball so that mitmproxy can use your intermediate CA.
Note
The following commands assume the mitmproxy.tgz file is in the home directory, and can be accessed via ~/mitmproxy.tgz
$ mkdir -p ~/.mitmproxy
$ tar xzf ~/mitmproxy.tgz -C ~/.mitmproxy
$ ls -1 ~/.mitmproxy
mitmproxy-ca-cert.cer
mitmproxy-ca-cert.p12
mitmproxy-ca-cert.pem
mitmproxy-ca-key.pem
mitmproxy-ca.pem
The certificates are now available to mitmproxy. Run mitmproxy so you can import the certificate into Firefox. You will now see the main mitmproxy screen.
$ mitmproxy
Configuring Firefox
We can now begin intercepting Firefox’s HTTPS traffic by importing the Intermediate CA that mitmproxy is now using.
- Open
Preferences > Advanced > Network - Click on
Settingsunder theConnectionheader - Select
Manual proxy configuration - Under
HTTP Proxyuselocalhostand port8080 - Check the box that says
Use this proxy server for all protocols
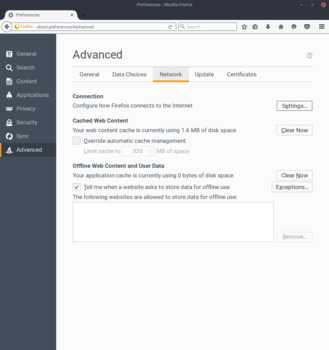
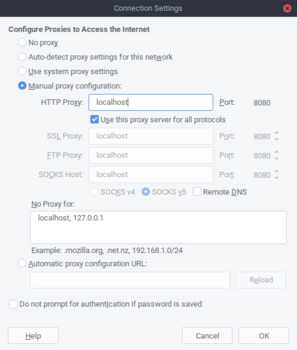
Once Firefox has the proxy configured, you can load the mitmproxy test page (http://mitm.it) to make sure the settings are valid. If you somehow misconfigured the proxy you should see the first screenshot, and if you configured the proxy properly you should see the second.

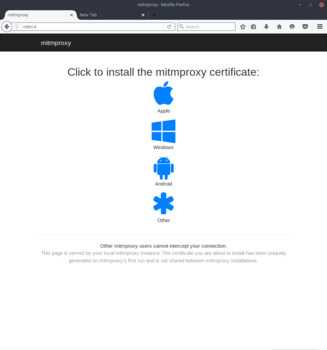
You’ve verified the configuration is correct, now import the Intermediate CA into Firefox
- Click on the link that says
Other - Click on
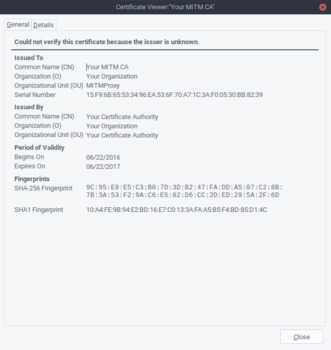
Trust this CA to identify websites - (Optional) Click on the
Viewbutton next toExamine CA certificateto make sure that the certificate is the one we created. The CN of the certificate should beYour MITM CA - Click
OK

Intercepting traffic with mitmproxy
Now you’re ready to start intercepting and decrypting HTTPS traffic. Let’s load https://example.com in Firefox. Although the traffic was encrypted via HTTPS, mitmproxy has intercepted and decrypted the request on-the-fly.

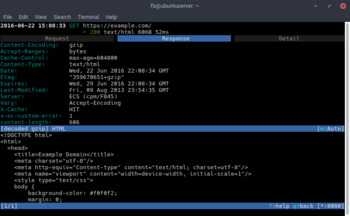
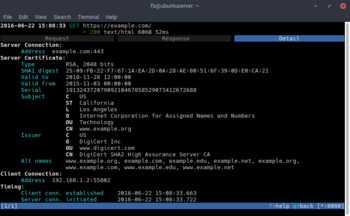
We can further investigate the request by pressing [ENTER] then hitting [TAB] to view the response the server sent for our GET request. You can see the decrypted response headers and body. The body is a gzip encoded payload, which mitproxy has decoded for us, and we can plainly see that it is an HTML document. Hitting [TAB] one more time will bring us to the TLS connection details. As you can see in the detail tab, the issuing CA for example.com’s certificate is Digicert. Once the page gets loaded in Firefox, the CA that encrypted your connection is Your MITM CA which we expected since we are performing man-in-the-middle attack on the browser.
If you keep mitmproxy open during a regular browsing session you will start to see what kind of traffic Firefox sends to and receives from servers. Although you could use the built-in debugger tool to see these requests by pressing F12, the debugger might miss some requests from extensions, and the pings Firefox makes to mozilla to check for extension updates, error reporting and others.
These are just the basics of what you can do with mitmproxy. If you want to learn more consult the mitmproxy documenation. You’ve now seen a practical use for a self-issued intermediate CA to easily decrypt HTTPS traffic in Firefox. The next blog post will use our current mitmproxy setup to intercept traffic for an Android device. Stay tuned!