This blog post is part 1 of my series on how to decrypt HTTPS traffic on your own network.
Analyzing traffic is an easy way to know what goes on behind the scenes in the programs and applications you use. Due to the reports of mass interception of Internet traffic, many companies have moved to securing their traffic with TLS and HTTPS. While encrypting traffic is great for privacy and security, it is harder to perform analysis on the traffic when you’re trying to debug a program, but you can still get around this on your own devices and computers.
CloudFlare is known for their DDoS mitigation and CDN services in addition to contributing to the Open Source community. One of their notable pieces of software is CF-SSL, their Public Key Infrastructure (PKI) toolkit. These tools make working with an X.509 PKI as easy as editing JSON files and running a few commands. Anyone who has tried to roll their own PKI using OpenSSL knows how painful the process can be, and CF-SSL makes working with X.509 a breeze.
This tutorial will teach you how to create your own Certificate Authority (CA) which you can use to generate certificates and keys to protect your own servers and services. The next tutorial will show you how to create an Intermediate CA to decrypt and analyze HTTPS traffic using mitmproxy.
Installing Go and Prerequisites
CF-SSL needs Go installed on your system. Since this tutorial is based on Ubuntu, installation is as easy as opening your terminal and typing:
$ sudo apt-get install golang
$ go version

go version go1.4.2 linux/amd64
If you are on another operating system you can follow the Go team’s installation instructions.
Installing CF-SSL
Now you can download and install CF-SSL. More detailed instructions are available on the CF-SSL GitHub page.
$ go get -u github.com/cloudflare/cfssl/cmd/...
$ cfssl version

Version: 1.1.0
Revision: dev
Runtime: go1.4.2
Creating the Root Certificate Authority
Now that we have the prerequisites installed, we can create a self-signed root CA certificate and private key. First create a directory to keep everything organized.
$ mkdir ~/certificate-authority
$ cd ~/certificate-authority
The Certificate Signing Request
Next we can create the certificate signing request JSON file that CF-SSL will read in order to create the root Certificate Authority. Edit the JSON file to fit your needs. The “C” field needs to be a valid 2 character country code.
Open your favorite text editor and save the following content as ca-csr.json
{
    "CN": "Your Certificate Authority",
    "hosts": [
    ],
    "key": {
        "algo": "rsa",
        "size": 4096
    },
    "names": [
        {
            "C": "US",
            "ST": "Your State",
            "L": "Your City",
            "O": "Your Organization",
            "OU": "Your Certificate Authority"
        }
    ]
}Generating the Root Certificate and Key
We can create the root certificate and private keys using the following commands:
$ cfssl genkey -initca ca-csr.json | cfssljson -bare ca
[INFO] generate received request
[INFO] received CSR
[INFO] generating key: rsa-4096
[INFO] encoded CSR
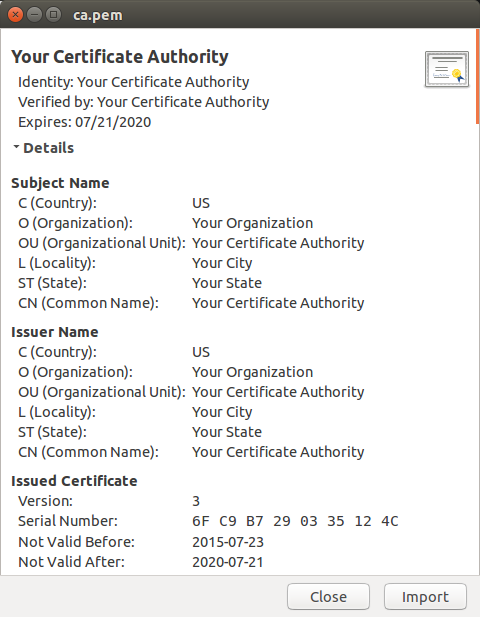
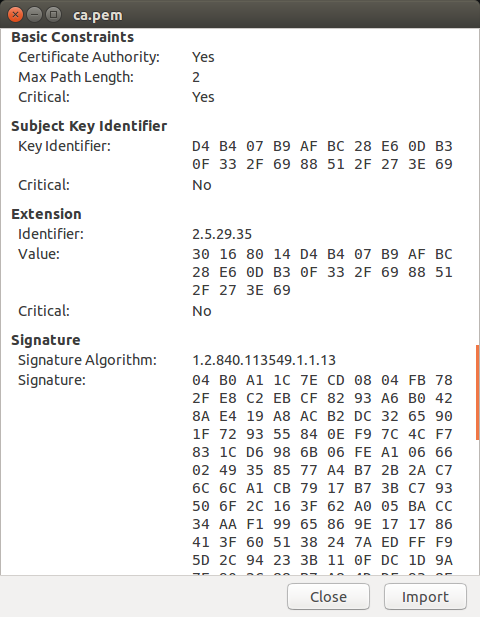
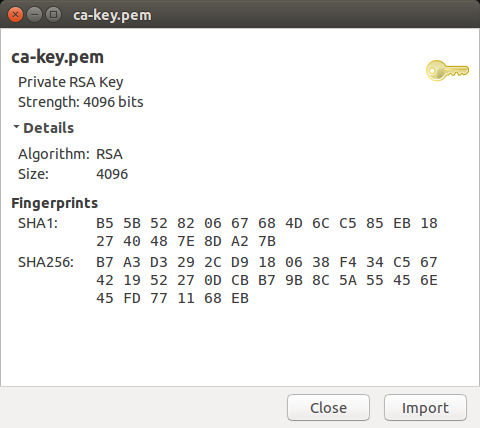
[INFO] signed certificate with serial number 3384034568888134572Now you can inspect the generated key and certificate files for the CA. On Ubuntu it’s as easy as double clicking ca.pem and ca-key.pem, which will open each file with gcr-viewer.
We can also use openssl to examine the certificate using the command line:
$ openssl x509 -in ca.pem -text -noout

Certificate:
    Data:
        Version: 3 (0x2)
        Serial Number: 8055170795304194636 (0x6fc9b7290335124c)
    Signature Algorithm: sha512WithRSAEncryption
        Issuer: C=US, O=Your Organization, OU=Your Certificate Authority, L=Your City, ST=Your State, CN=Your Certificate Authority
        Validity
            Not Before: Jul 23 04:30:00 2015 GMT
            Not After : Jul 21 04:30:00 2020 GMT
        Subject: C=US, O=Your Organization, OU=Your Certificate Authority, L=Your City, ST=Your State, CN=Your Certificate Authority
        Subject Public Key Info:
            Public Key Algorithm: rsaEncryption
                Public-Key: (4096 bit)
...
        X509v3 extensions:
            X509v3 Key Usage: critical
                Certificate Sign, CRL Sign
            X509v3 Basic Constraints: critical
                CA:TRUE, pathlen:2
            X509v3 Subject Key Identifier:
                D4:B4:07:B9:AF:BC:28:E6:0D:B3:0F:33:2F:69:88:51:2F:27:3E:69
            X509v3 Authority Key Identifier:
                keyid:D4:B4:07:B9:AF:BC:28:E6:0D:B3:0F:33:2F:69:88:51:2F:27:3E:69

$ openssl rsa -in ca-key.pem -check

RSA key ok
-----BEGIN RSA PRIVATE KEY-----
...
-----END RSA PRIVATE KEY-----
Note
In both the openssl output and the gcr-viewer screenshots, the X.509 Basic Constraints sections specify that the certificate you just generated is a Certificate Authority (CA:TRUE) and that the Max Path Length is 2.
For information about pathlen, see this OpenSSL page about Basic Constraints, the important snippet follows:
The pathlen parameter indicates the maximum number of CAs that can appear below this one in a chain. So if you have a CA with a pathlen of zero it can only be used to sign end user certificates and not further CAs.
In the above example, the path length is 2, which means that we can have a chain like this one:
Root CA > Intermediate CA > 2nd Intermediate CA > Certificate
In the above setup, 2nd Intermediate CA can freely generate valid non-CA certificates.
Warning!
The private key we generated is NOT password protected. You need to make sure you keep it secure, especially if you are planning on importing the root certificate into your devices. Once a device trusts your root CA, anyone who gets a hold of the root private key can generate valid certificates that will be inherently trusted by those devices.
Importing the Root Certificate Into Firefox
Now we can import the certificate file into Firefox. It’s as easy as dragging ca.pem and dropping it into Firefox. You can also use the File menu > Open File (or ctrl + o) to open the ca.pem file and import the certificate.
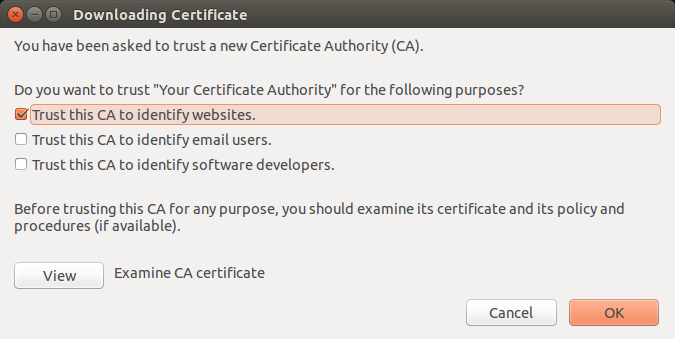

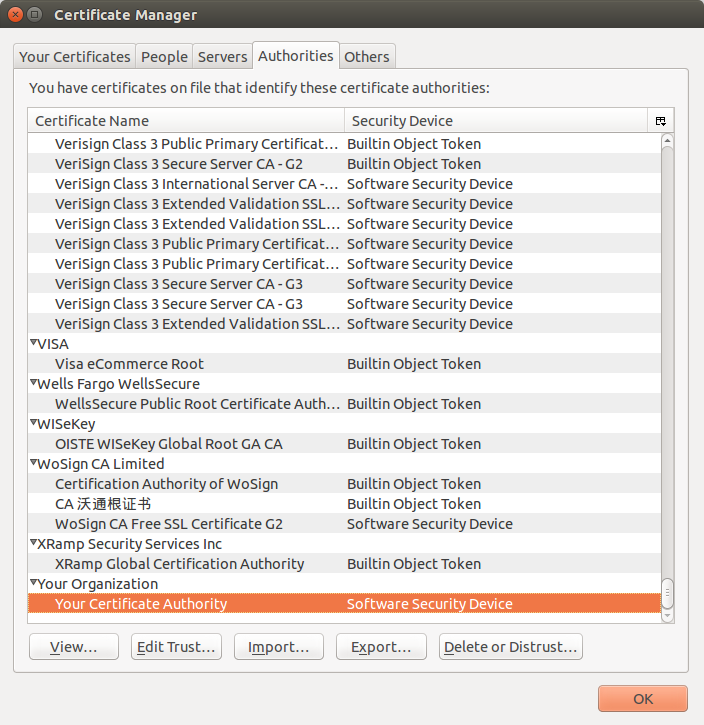
You can also examine the installed Root CAs in Firefox by going to Preferences > Advanced > Certificates > View Certificates. Click on the Authorities tab on the Certificate Manager window.
Next Steps
Now that you have imported the root CA certificate into Firefox, you can begin generating certificates signed by this CA for your own servers and services (stunnel, nginx, Apache, etc.) in order to use TLS with them. My next blog post will show you how to take advantage of the root CA by generating an intermediate CA for mitmproxy that we will use to decrypt and analyze HTTPS traffic.
Blog Post Updates
On April 6, 2016 Benjamin White @nibjib pointed out to me that the information about the pathlen constraint for CAs was incorrect. The information is now updated and accurate according to the OpenSSL website.